Seated Exercise Gear for Seniors: What Works and When
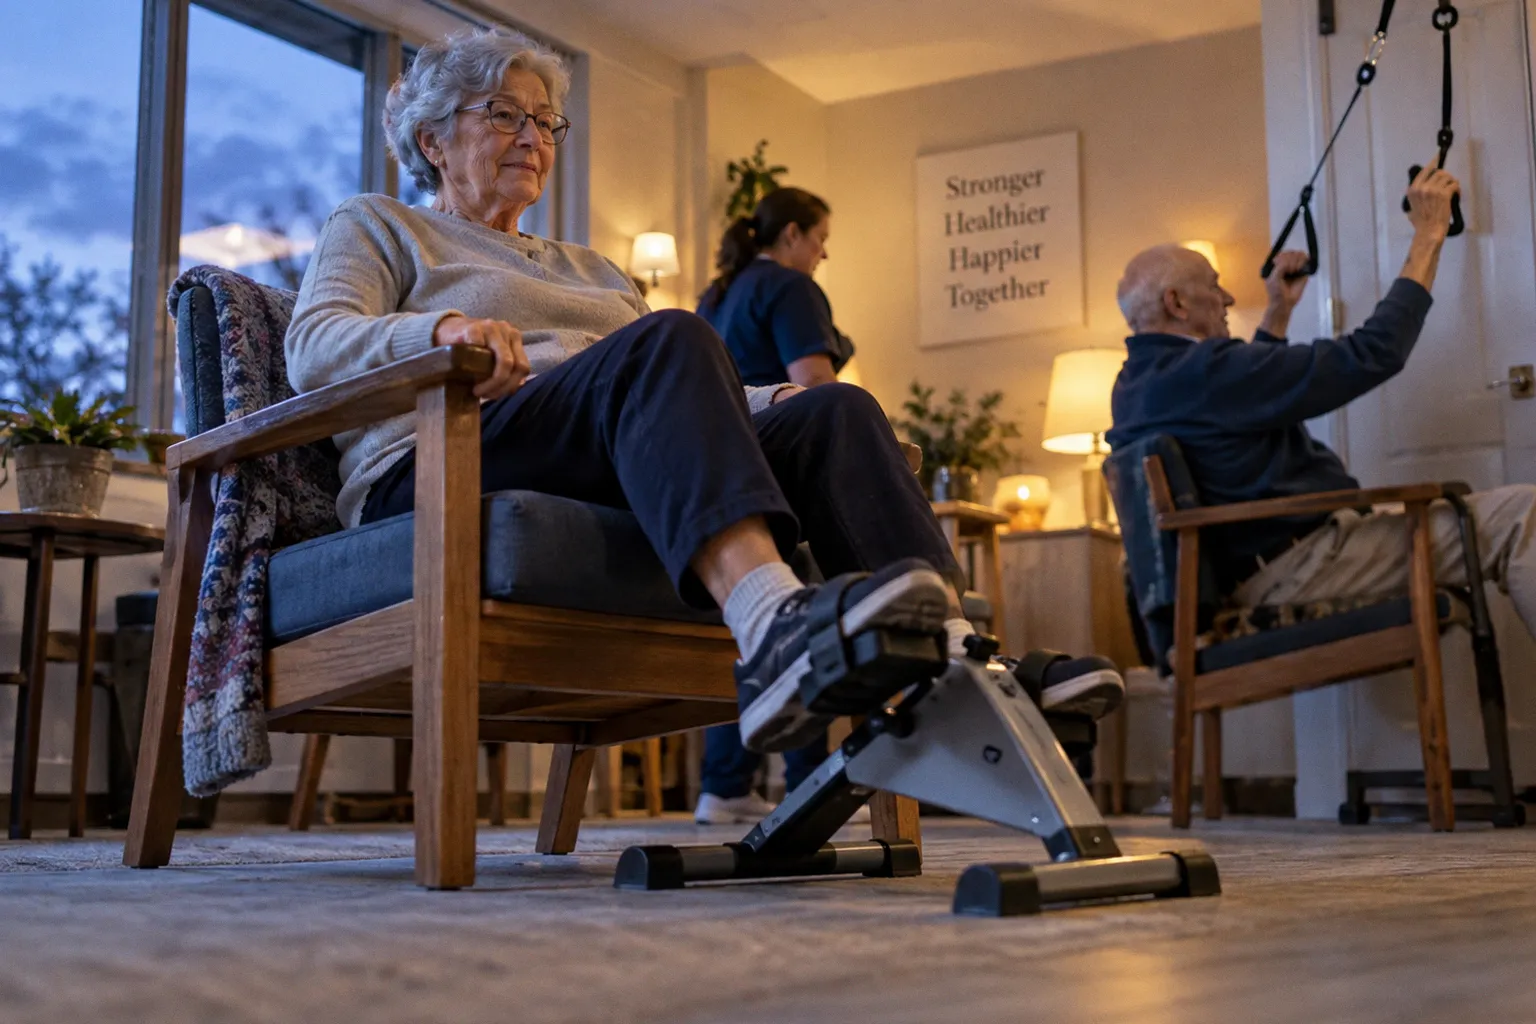
Joint stiffness, reduced balance, sarcopenia, postoperative weakness, and fear of falling can make standing exercise feel inaccessible even when movement would support better circulation, flexibility, and functional strength. Roughly 30% of adults over 70 experience difficulty with basic mobility tasks such as walking, rising from a chair, or climbing stairs. That is a substantial group of residents for whom the usual advice to “walk more” is incomplete.
Seated exercise equipment for assisted living seniors can fill that gap. Under-desk pedal exercisers, resistance bands, shoulder pulleys, and power-assisted motor trainers allow residents to work within a stable seated position. They are not substitutes for physical therapy, gait training, or a clinician’s assessment. Used thoughtfully, however, they can make regular movement more realistic and less intimidating.
The most effective choice is rarely the most complex machine. It is the equipment that matches a resident’s current functional ability, sensory baseline, attention span, and care plan—and that staff can supervise consistently.
Why seated exercise is clinically useful
Seated movement changes the risk profile of exercise. A resident who cannot safely stand for ten minutes may still be able to pedal gently, complete supported arm movements, or perform repeated ankle and knee motions from a sturdy chair. That does not make the exercise risk-free, but it can lower the physical and psychological barrier to participation.
Short sessions are particularly practical in long-term care. Five to 15 minutes of low-impact movement, repeated on most days, can support circulation, ease stiffness, and maintain functional strength. For a resident with limited endurance, several brief bouts may be more manageable than one formal workout.
We should also be precise about the goal. Seated exercise is not simply a way to keep residents occupied. Depending on the equipment and the person’s starting ability, it may support:
- Lower-body movement when walking tolerance is limited.
- Gentle cardiovascular conditioning without repeated weight-bearing.
- Shoulder and arm mobility after a period of reduced use.
- Muscle activation for residents with deconditioning or sarcopenia.
- A predictable daily routine that supports confidence and participation.
- Preparation for standing, transfers, or therapy when those activities are part of the resident’s plan.
The equipment itself does not create the benefit. The benefit comes from an appropriate dose of movement, repeated consistently, with environmental triggers and symptoms monitored along the way.
A resident who becomes more alert and engaged after a short morning pedal session may be showing a useful behavioral expression of improved comfort or arousal. Another resident may become frustrated by the same device because the visual instructions are confusing, the pedals move too quickly, or the chair is unstable. We need to assess the response rather than assume that a popular product is universally suitable.
The best seated exercise device is the one a resident can use safely, understand clearly, and return to often enough for it to matter.
The main types of seated exercise equipment
There are four broad categories worth considering in assisted living and rehabilitation settings. Each serves a different purpose, and the distinctions matter more than the marketing language attached to the product.
Under-desk pedal exercisers
Under-desk pedal exercisers are compact devices that allow a resident to pedal forward or backward while seated. They are often the most accessible starting point for lower-body movement because the resident does not need to step onto a platform or maintain standing balance.
Forward pedaling can provide a gentle repetitive motion for the hips, knees, and ankles. Reverse pedaling changes the movement pattern and may help maintain coordination and range of motion, although the resident should only use the direction that feels controlled and comfortable.
These devices are most useful when:
- The resident can sit upright in a stable chair.
- Both feet can reach and remain on the pedals.
- The resident has enough lower-limb control to begin and stop without panic.
- The goal is gentle circulation, mobility, or endurance work rather than high-intensity conditioning.
- Staff can position the device so it does not slide or interfere with transfers.
Pedal exercisers are not automatically appropriate for every resident with knee or hip pain. A low-impact movement can still aggravate symptoms if the range of motion is too large, the resistance is excessive, or the resident is compensating with poor posture. Start at low resistance. The first question is whether the resident can repeat the movement without strain, breath-holding, grimacing, or escalating anxiety.
Color-coded resistance bands
Resistance bands are versatile, inexpensive, and easy to store. In senior wellness programs, color coding can make different resistance levels easier to distinguish, but the colors are not standardized across every manufacturer. Staff should not assume that a particular color represents the same resistance from one brand to another.
Bands can support seated upper-body work, gentle leg activation, and functional movements such as pulling, pressing, or controlled shoulder rotation. Their flexibility is also their main limitation: the equipment does not provide much external stability. A resident must be able to hold the band, follow the movement, and avoid allowing it to snap back toward the face or hands.
Bands work well when the session is individualized and the band is anchored securely. They are less suitable when a resident has significant confusion about sequencing, poor grip control, uncontrolled shoulder pain, or a tendency to pull abruptly.
For residents living with cognitive impairment, reduce the number of instructions. Demonstrate one movement at a time. A band session can become a behavioral challenge when the resident is asked to remember several steps, switch sides repeatedly, and monitor resistance at the same time.
Over-door shoulder pulleys
Over-door pulleys are designed to assist shoulder and arm rehabilitation in home and assisted living environments. They can provide a supported way to work through shoulder movement, particularly when active range of motion is limited.
The setup must be secure, and the door must be appropriate for the device. The pulley should not be installed where it blocks an exit, interferes with a resident’s mobility route, or creates a risk of the door opening unexpectedly. The resident also needs a stable seated position and clear guidance about how far to move.
A shoulder pulley should never become a contest to achieve a larger range. Pain, guarding, or a sudden change in movement quality is a reason to stop and reassess. If the resident is recovering from surgery or has a diagnosed shoulder condition, the exercise should follow the prescribed rehabilitation parameters rather than a generic routine.
Power-assisted motor trainers
Power-assisted motor trainers move the limbs mechanically while the resident participates at a level appropriate to their ability. These machines may be considered when voluntary movement is very limited, fatigue develops quickly, or the resident needs a structured rehabilitation session.
Their advantage is that the device can help maintain repetitive motion even when the resident cannot generate consistent force. Their disadvantages are cost, space, setup requirements, and the need for trained oversight. A motor trainer is not automatically better than a pedal device simply because it is more sophisticated.
Some power-assisted workouts are organized as circuits lasting approximately 30–40 minutes. That duration may be reasonable for a supervised program, but it should not be treated as a default target for every resident. A person with low endurance may begin with a much shorter session, while a resident with significant medical complexity may need a clinician to establish the appropriate duration and intensity.
How the options compare
The right comparison is not “Which machine has the most features?” It is “Which movement pattern addresses the resident’s current limitation without introducing a new problem?”
| Equipment | Primary use | Best fit | Main operational concern |
|---|---|---|---|
| Under-desk pedal exerciser | Repetitive lower-body movement and gentle seated cardio | Residents who can sit steadily and control both feet | Sliding, poor pedal reach, excessive resistance, or unsafe chair placement |
| Resistance bands | Seated arm, shoulder, and leg strengthening | Residents who can follow simple instructions and maintain grip | Bands can snap back, become tangled, or encourage abrupt pulling |
| Over-door shoulder pulley | Supported shoulder and arm mobility | Residents with an appropriate rehabilitation goal and stable setup | Incorrect anchoring, excessive range, or use despite pain |
| Power-assisted motor trainer | Repetitive movement with mechanical assistance | Residents with limited voluntary strength or endurance in a supervised program | Cost, setup, staff training, and the need for individualized settings |
This table also explains why a facility should avoid buying a single device for every resident. Equipment selection belongs inside a broader mobility program. Some residents need circulation and joint movement. Others need strengthening. Others need a carefully limited range of motion after an orthopedic procedure. Those are different clinical tasks.
A practical way to introduce equipment
A successful introduction is usually quieter and simpler than families expect. We do not need to present the device as a major fitness event. For a resident who is wary, a short, predictable session often works better than an enthusiastic invitation to complete a full workout.
1. Start with the resident’s current function
Before choosing equipment, observe how the resident sits, reaches, follows a cue, and responds to effort. Ask:
- Can the resident remain seated without sliding forward or leaning sharply to one side?
- Can they place both feet on the floor or on the equipment safely?
- Do they understand a one-step instruction?
- Can they report discomfort, or do staff need to rely on facial expression and behavior?
- Does fatigue appear as shortness of breath, slowed responses, irritability, or loss of posture?
- Is there a recent change in strength, alertness, pain, or coordination?
This is not a formal therapy evaluation, but it prevents a common mistake: selecting equipment based on diagnosis alone. Two residents with arthritis may have completely different movement tolerance and attention needs.
2. Stabilize the environment first
Environmental triggers can determine whether a session feels safe. Use a firm chair with appropriate height and arm support when needed. Place the equipment where staff can observe without blocking a transfer route. Reduce clutter, glare, and unnecessary conversation during the first sessions.
For residents with dementia or sensory sensitivity, the device may be less important than the surroundings. A loud activity room, a crowded hallway, or a sudden change in routine can produce resistance before the first movement begins. Establishing a familiar location and consistent time may improve participation more than adding another feature to the equipment.
Check that:
- The chair does not roll or shift.
- The resident’s feet can reach the pedals or floor.
- The device is close enough to use without leaning forward.
- Tubing, bands, and cables are out of the walking path.
- The resident can stop the activity quickly.
- Staff can access the resident’s hands and feet without awkward positioning.
3. Begin below the resident’s apparent capacity
Starting conservatively is not a sign that the program is weak. It allows us to identify the resident’s sensory and physical response before fatigue changes the picture.
For a pedal exerciser, begin with low resistance and a short interval. For a resistance band, choose a level that permits smooth movement rather than maximal effort. For a shoulder pulley, use a comfortable range and avoid forcing the arm higher because the device allows it.
Watch the quality of movement. Smooth, controlled repetitions are more informative than a high number of repetitions performed with breath-holding or trunk compensation.
4. Use one cue at a time
A long explanation can overwhelm a resident, particularly when hearing loss, aphasia, or cognitive impairment is present. Use short language, demonstrate the movement, and allow time for the resident to respond.
Instead of giving several instructions at once, guide the sequence:
1. Sit back in the chair.
2. Place both feet securely.
3. Begin slowly.
4. Continue only while the movement feels comfortable.
5. Stop when asked.
If the resident becomes distressed, do not interpret the response as noncompliance. Distress may be a communication of pain, fear, confusion, overstimulation, or loss of control. We should pause, identify the likely trigger, and modify the approach.
5. Record response, not just completion
A completed session is not necessarily a successful session. Staff documentation should capture the resident’s tolerance and behavioral expression in practical terms:
- How long the resident participated.
- Whether the movement remained controlled.
- Any pain behavior, fatigue, dizziness, or shortness of breath.
- Whether cueing was verbal, visual, or hands-on.
- What time of day and environment supported participation.
- Whether the resident was calmer, more alert, or more fatigued afterward.
This information helps the care team distinguish a useful routine from one that is quietly increasing discomfort.
Matching equipment to common care goals
When the goal is circulation and stiffness
An under-desk pedal exerciser is often the most straightforward option. Gentle forward and reverse pedaling from a seated position can encourage lower-body movement without the joint loading associated with standing exercise.
The resident should not be expected to pedal continuously if that creates fatigue. Short bouts may be sufficient, especially when repeated on most days. The device should support movement, not become another task that the resident must endure.
When the goal is upper-body mobility
An over-door pulley or light resistance band may be appropriate, depending on the resident’s shoulder status and rehabilitation plan. The distinction is important. A pulley can assist movement, while a band adds resistance. If the resident currently needs help completing the range, adding resistance may be premature.
For shoulder rehabilitation, pain and movement quality matter more than the number of repetitions. A resident who begins shrugging the shoulder, leaning the trunk, or guarding the arm may be compensating rather than improving.
When the goal is strength maintenance
Resistance bands can be useful for maintaining functional strength when selected and anchored appropriately. Seated strengthening may address the arms, shoulders, and some lower-body muscle groups, but it should be connected to a practical goal such as supporting transfers, reaching, or maintaining posture.
We should avoid presenting resistance as a test of toughness. High resistance is not necessary for older adults, and starting too heavily can reduce consistency by causing soreness or fear. The most useful setting is one that permits repeated, controlled movement with good form.
When the goal is participation after deconditioning
Power-assisted motor trainers may help residents who cannot yet produce consistent voluntary movement. They can provide a structured experience of exercise and may serve as one component of a rehabilitation program.
Still, mechanical assistance should not be confused with independence. If the resident is able to participate actively, the machine should not do more of the work than necessary. The aim is to support engagement at the resident’s current level and progress carefully as function changes.
Safety concerns that deserve more attention
Seated equipment reduces some risks associated with standing exercise, but it does not eliminate falls or medical complications. A resident can slide from a chair, catch a foot in a pedal, strain a shoulder, become dizzy, or experience shortness of breath while seated.
Stop the session and seek clinical guidance when there is new or worsening chest discomfort, severe breathlessness, faintness, sudden weakness, acute pain, or a marked change in mental status. Facility protocols and the resident’s care plan should guide the response.
There are also less dramatic warning signs. Repeatedly refusing the equipment, becoming unusually irritable, rubbing a joint, guarding one side, or losing posture may indicate that the exercise is poorly matched. In residents who cannot reliably describe pain, these behavioral expressions deserve clinical attention rather than dismissal.
Do not use seated exercise gear to replace prescribed physical therapy. Do not assume that a resident is safe simply because the device is labeled low impact. And do not place equipment in a resident’s room or common area without considering transfers, wheelchair access, oxygen tubing, footrests, and the staff’s ability to supervise.
What families should ask before buying equipment
Families often see a compact pedal machine or resistance-band set online and wonder whether it would help a parent in assisted living. The answer depends less on the product page than on the facility’s process.
Ask the rehabilitation or nursing team:
- Is the resident currently cleared for this type of movement?
- What is the specific goal: circulation, mobility, strengthening, or rehabilitation?
- Can staff help with setup and supervision?
- Where would the device be stored?
- Does it interfere with transfers or wheelchair positioning?
- What symptoms should prompt staff to stop?
- How will the team document tolerance and progress?
- Would a simpler device be safer and more likely to be used?
A family-purchased device can become an awkward object if no one is responsible for fitting it into the care routine. Before bringing equipment to a community, confirm that staff can use it appropriately and that it aligns with the resident’s plan of care.
The honest verdict
For most assisted living settings, under-desk pedal exercisers offer the best balance of accessibility, low-impact movement, and straightforward supervision. They are especially practical for residents who can sit securely and need regular lower-body activity without standing for long periods.
Resistance bands are the most versatile option, but they require more instruction and better judgment about grip, anchoring, and resistance. Over-door pulleys are useful for targeted shoulder and arm rehabilitation when the setup and range of motion are clinically appropriate. Power-assisted motor trainers have a role in structured rehabilitation, particularly when voluntary movement is limited, but their additional complexity does not make them the default choice.
The deciding factor is not whether a device looks therapeutic. It is whether the equipment supports a repeatable movement routine that respects the resident’s current abilities.
Seated exercise gear works best when it is introduced gradually, paired with a stable environment, and interpreted through the resident’s behavior as well as their physical performance. We are not trying to force every person into the same exercise pattern. We are creating a safe opportunity for movement, then adjusting the plan as the resident’s strength, comfort, attention, and confidence change.
That is the practical standard: not a perfect workout, but consistent participation without sacrificing dignity.
FAQ
What is the best seated exercise equipment for seniors in assisted living?
Are seated pedal exercisers safe for older adults with knee or hip pain?
How long should seniors use seated exercise equipment?
Are resistance bands suitable for seniors with dementia?
When should a seated exercise session be stopped?
Related articles
 Senior Wellness & LivingSocial activities for introverted seniors in assisted living
 Senior Wellness & LivingAssisted Living Dining Options for Specific Dietary Needs
 Long-Term CareFall prevention protocols: three clinical approaches compared
 Long-Term CarePressure ulcer prevention tools for skilled nursing facilities